
In a modern home/office there are generally several PCs being used at any one point, but having several computers should not mean you have to have a printer attached to every single one. You could of course invest in a network enable printer or a wireless printer that you can all use, but this could end up being an expensive purchase. Besides if you already have a functioning printer wouldn’t it be easier for everyone to use that? Thankfully, it is possible to share any printer on your network regardless of whether it is wireless or a networkable printer and it can be done in several easy steps.
Enable Printer Sharing
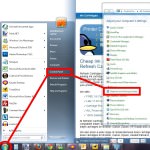
First of all we need to tell your PC that you are willing to share your printer with other users on your network. By default Windows 7 will have this function disabled for your security, but enabling it is mercifully easy.
- First click the Start button on the bottom left of your screen. Then select Control Panel and then Network and Sharing Centerfrom Control Panel.

- From Network and Sharing Center select Change advanced sharing settings from the panel on the left.

- In the new window locate a section titled “File and printer sharing” and select Turn on file and printer sharing. Click Save changes at the bottom and we are done here.


Sharing Your Printer
With all the relevant settings changed it is time to actually share your printer across your network.
- Click Start again and then select Devices and Printers from the panel on the right.

- Find the printer you wish to share Right-Click it and click Printer properties. Do NOT click Properties.

- Click the Sharing tab, and select the Share this printer check box.


Adding A Network Printer
Other people on your network can now access your printer. For it to appear in their list of available printers they will still need to add the newly networked printer.
- Open Devices and Printers by going to the Start icon and then Devices and Printers as we have done previously.

- Click Add a printer from the bar at the top of Devices and Printers.

- Click the second option which should read Add a network, wireless, or Bluetooth printer.

- You will now be presented with a list of available printers on your network. Select the relevant printer and follow the on-screen instructions.


I hope you have found this guide useful. If however you have anything to add or have any further questions, please get in touch via any of our social media platforms.

